Best Modules for Media in Drupal: How to Install and Configure Scald
In the first part of this series, “Scalable & Sustainable Media Management for Drupal Websites”, I talked about media management solutions for Drupal. Specifically, I am interested in managing large amounts of files in a reusable manner. The solution I like best at the moment is Scald.
Just so we don't get confused with some phrasing, Scald stores all media items as custom entities called "atoms"; Scald "contexts" are very similar to view modes.
Setting up and configuring Scald for Drupal takes work and planning. However, if you've ever used the node reference or entity reference modules, you'll catch on very quickly.
Scald comes with a number of sub-modules. To get it working you will first need to install:
-
Scald core – the basic engine to drive the rest
-
Atom reference – a field type to reference (display) media on your page (like entity reference module)
-
DnD Library – so you can drag files from the media library and drop them on your page
-
MEE – if you want users to be able to define metadata on media embedded in textareas (such as copyright information)
These modules will get Scald working, but you'll need to add in some providers (other sub-modules) to define how you get your media assets to your page. Here's what I like:
-
Scald Audio – allows you to upload audio files
-
Scald SoundCloud – allows a SoundCloud URL to be an audio asset
-
Scald File – allows files to be media assets
-
Scald Image – allows image files to be media assets
-
Scald YouTube – allows a YouTube URL to be a video asset
-
Scald Vimeo – allows a Vimeo URL to be a video asset
There is a full list of "Scald providers" here, so you can extend it to include Facebook, Instagram, Pinterest, Twitter, Flickr, Vine, DailyMotion, and more ... up to and including Drupal Commerce products as atoms!
With this many modules installed (I know, it's a lot), you are ready to use Scald. This is what you will need to do:
-
Add an “Atom reference” field to a content type
-
Select what atom types can be referenced by this field, for example video, audio, image
-
Set the representation of the atom on the edit page (this is how the atom will look when you are creating or editing pages with atoms displayed)
-
Create a node and add an atom to it, like so:
-
Click on one of the icons in the sidebar slider for the type of atom you want, for example image
-
Use the file select UI to choose what image you want to upload
-
Give the image a title (you will be able to use this when searching for it in future)
-
Add an author or authors (you will be able to find images by author later on)
-
Add some tags (as above, you will be able to filter images by tag)
-
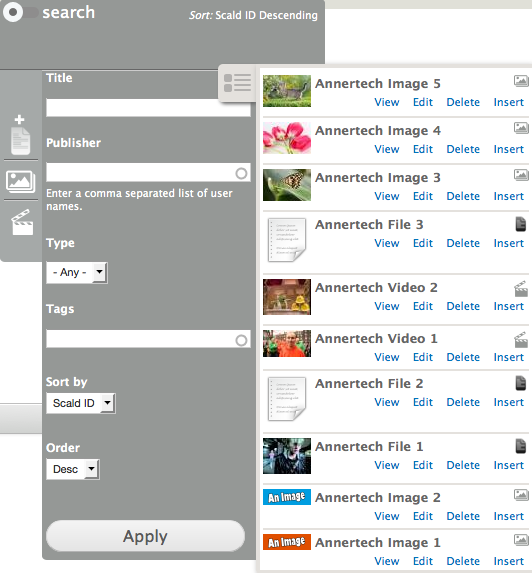
Click on the sidebar slider's menu button and a list of all your atoms will show up
-
Drag and drop the atom you want onto the “dropbox”
-
-
Or, you can search for an find an atom that has already been uploaded by clicking on the little circle button on the top of the sidebar
-
This will bring up the exposed filters which you can use to filter your atoms
-
As it is views powered, you can configure this any way you want
-
Drag and drop the atom you want onto the “dropbox”
-
-

This will give you basic functionality, but the media being displayed is probably not as you want it just yet – more than likely it will only be displaying the title of the file. To change this you will need to go to your “Manage Display” settings and select a different display format; set it to editor representation or preview representation, then go back and refresh your page, and things should look better.
These “representations” that I mentioned are called “contexts” in Scald. You can think of them as view modes for other entities. So, it's quite similar to using entity reference fields, in that you reference the entity of the edit page, and then set what view mode (or context in this case) you want to use to display it.
If you go to the Scald configuration page (admin/structure/scald) you can see how each atom type is going to get displayed for each view mode that it is used on, but also for each context selected. This makes it a bit like a view mode inside a view mode, which makes it very configurable and customisable. And, you can create your own custom contexts here (I suggest you do). Creating your own contexts allows you to have different display types for different atom types on different view modes (you might have meta data, authors, publishers, etc showing on backend views, the atom with a thumbnail preview on teasers, and the atom with a large image preset on full nodes).

Once you are that far, you can then create features of all of our Scald items to store them in configuration and export them to your test and production servers. You can also, then, reuse them on other sites.
So, that's a basic run through how to install, set up, and configure Scald to manage large amounts of media in Drupal websites. If you need some help to get up to speed with all of this, get in contact by clicking the button below.
If you want to discuss Annertech helping you build an award-winning website, please feel free to contact us by phone on 01 524 0312, by email at hello@annertech.com, or using our contact form.

